Debunking Three Tri Bike Fitting Mythsby Greg Pelican
|
||||||||||||||||||||||||
 fits, there seems to be an epidemic of problems with tri bike sizing. These problems are mostly related to the bike being too small and the bars too low relative to the seat height.
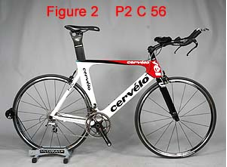
Bike |
Size |
Seat Tube |
Top Tube |
Head Tube |
Cervelo |
58 |
58 |
58 |
18 |
Cervelo |
58 |
56 |
56 |
16 |
Cervelo |
56 |
54 |
54.5 |
14 |
Indeed the Cervelo P2C tri bike in size 58 fits me correctly and is smaller than my road bike. If I try to 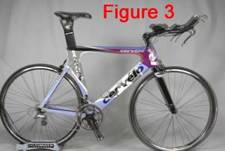 apply my position to the 56 P2C it is difficult for me to get the bars high enough or the reach long enough (more on this later).
The trick is to study the manufacturer’s geometry specs and try to glean the actual measurements of the bike. Cervelo does a good job of explaining their tri bike geometry…
"All our TT/tri bikes have a dropped top tube and shortened head tube to enable the rider to position the aerobars low enough for a proper aero position. This means that the frame size is no longer equivalent to the seat tube length, so don't determine the size that way. Simply go by the size sticker, or measure the head tube and look it up in the above chart.”
Cannondale does a good job as well. The actual dimensions are clearly listed in the geometry table and they are indeed smaller than the designated size. Cannondale states…
“If you ride a 56 road frame you should choose a 56 Slice frame.”
But with Trek and Specialized the water gets murky. They shift to a small, medium, large system that is hard to correlate to a normal road bike size. And the Trek seat tube size is really confusing as it includes the seat-post mast as well which inflates the size that is indicated.
Wow that was a lot of words just to explain how manufacturers size their tri bikes! No wonder there is confusion. And be aware that some manufacturers and bike fitting systems measure from the center of the bottom bracket to the center of where the top tube intersects the seat tube, while other companies measure center to top. So if you were bike fit on a center to center system, you need to add 15 mm to convert to a center to top bike. This is another potential cause for tri bikes being sized too small, as the most common bike fitting system (The Fit Kit) is based on center to center measurements. It’s certainly the job of the bike fitter to understand this as well as understand the system each manufacturer uses to size their bikes.
There is no substitute for an experienced bike fitter who understands tri racing and position. The bike fitter should consider the rider dimensions, flexibility, core strength, cycling experience, normal riding topography and target race discipline. So seek out the best bike fitter you can find.
With custom builders such as Guru and Serotta all of this confusion is eliminated. I take a clean slate approach. I simply put the rider on the Serotta Size Cycle with the target seat and bars, find the optimum position, tell the custom builder the dimensions, and they build it
The second common misconception is that a smaller frame is better than the correct size frame. The last sentence doesn’t even make sense, never mind someone spending $5000 on a bike too small for them, yet I hear it everyday. I suspect this misconception comes from looking at what size bike a given pro rides. For example (and I’m paraphrasing here) the National Time Trial Champion is 6 foot and he rides a 54 Cervelo P3. So this is what the 6 foot 45 year old age grouper thinks he should be on. Unfortunately some of the manufacturers reinforce this misconception.
Naturally if we take a professional athlete in the prime of their life, some pros (not all) are going to be very flexible and the many miles of training and racing allow them to ride in an aggressive position where the bars are very low compared to the saddle. Most of these sponsored athletes don’t have the luxury of getting a custom frame and have to take what the manufacturer is selling off the shelf. So if the flexible pro wants to get in an aggressive and low position they must take an off the shelf frame that has a small head tube. This frame would be smaller than what is normal for the general population. And the pro may need to use a long stem to compensate for the shorter top tube of the small frame.
But using the most flexible pros as a model for age group bike sizing is simply not realistic. The average triathlete coming into Bethel Cycle is in their 40’s, has limited cycling experience and only have fair flexibility and core strength. When I put them on the Serotta Size Cycle to see where they can get comfortable and relaxed on the bike, the aero-bar pad height is always much higher than the pros that they are trying to mimic. It’s unlikely that these riders could tolerate being in the pro’s position for even 15 minutes, never mind run after!
Our goal is to get the rider comfortable, safe and stable on their tri bike and have them ride as much as possible. Miles and experience will get them faster and stronger. Hopefully over time we can readjust the bike to a more aggressive position where they still are comfortable, but more aero. But keep in mind in the real world we get older every day and injuries can limit our flexibility so we need to consider that although our goal is to decrease the bar height, we may need to increase it over time.
With that in mind I like to size bikes in a way that puts the rider in their natural sweet spot. Where there is some adjustability to move the bar height up and down over time and even have some reach adjustability. Unfortunately I have seen a disturbing trend that many shops recommend a smaller that normal tri bike but compensate for the low bars by using a longer and steeply angled up stem with the maximum amount of spacers to get the bars to achieve a reasonable position.
What can get a bit confusing is that it is possible to correctly fit a person in the same position on more than one size bike from a manufacturer by adjusting the different elements of the bike. This is possible because it is contact points of the bike that matters. I have outlined the key factors to setting up a rider's position on any bike below.
Key Factors to Rider Position on the Bike:
- Seat Height: Measured from the center of the pedal axle at the furthest point of the pedaling arc in a
 straight line to mid point on where the rider sits on the saddle.
- Seat Tube Angle / Effective Seat Tube Angle: Manufacturers typically measure the angle of the seat tube and put this in their specs. But the real angle or effective angle is determined by a number of factors. They are the seat post setback position, the position of the seat on the rails, the saddle and even where the rider sits on the saddle. I like to measure the effective angle as well. I do this with a big carpenter’s level and measure the angle from the center of the bottom bracket to a mid point on the saddle where the rider sits. The next factor, seat setback is related to the effective seat angle.
- Seat Setback from the Center of the Bottom Bracket: The bottom bracket (BB) is the “center” of the bike from a design and fitting perspective. You need to know the proper distance behind the BB for the saddle as well as the relative height. Some people measure from the nose of the saddle to the BB, but this isn’t a good idea as not all saddles are the same length. A good reference point is the middle of the straight part of the rails of the saddle. Serotta makes a great tool called the Serotta X-Y tool (see Figure 4) where we can measure the distance above and behind the center of the bottom bracket to the mid seat position. This makes it easy to have a repeatable benchmark reference for a rider that can be easily transferred from bike to bike.
- Drop from Seat to Aerobar Pads and Bars: This is another key measurement. I simply take a large level and then measure the drop from the area where the rider sits on the saddle to the
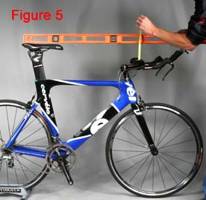 top of the aero pad (see Figure 5). You can also measure the drop to other key areas of the handlebar.
- Reach to the pads and the bars. The Serotta X-Y tool can be also used to measure the pads relative to the center of the BB, again the distance forward and above the BB center. This is another way to set (or double check) the bar / pad height.
Once you have determined the optimum key fitting factors for a given rider you can use them to set up their position on the target bike. As I previously mentioned it may be possible to correctly positioned a rider on more than one size tri bike.
But there are some safety, practical, style and financial reasons that make one size better than the other.
If I use myself as an example (please reference the above table) my normal size Cervelo is a 58. But it is possible to put my 6 foot 1 inch body in the same position on a 56 P2C. I can do this by using a longer stem in an angled up position along with the maximum amount of spacers under the stem. In "Figure 3" you can see a superimposed picture
of both the 58 and 56.
While I am able to set up my position on the smaller than normal 56 bike (remember it is only actually 54 cm), I see five problems with this approach.
- There is no ability to make the bars higher if needed in the future. Remember aging and injuries…
- The smaller frame requires the maximum amount of spacers allowable and the large unsupported area above the headset increases the flexibility of front end of the bike, which can cause handling problems and even a safety risk. Personally I wouldn’t be comfortable bombing a 45 mile per hour descent on the 56 cm setup with max spacers and an angled up stem.
- There is no ability to make the reach longer over time. You might ask why I would want to go longer if the bike was fit correctly. Well what if I moved to Kansas and never had to climb hills again, I might want to try a steeper effective seat angle and get lower on the front. In this case I would push the saddle forward and then have to move the bars forward as well, which would not be possible.
- This is a personal thing and has to do with style and taste, but I hate the way a ton of spacers and a steeply angled up stem looks on a bike. It looks like the rider bought the wrong size and is trying to fix the problem. I guess that’s my point.
- And finally when you buy a bike that is too small the components that come with that size frame are designed for a smaller person. This means that some of the parts will need to be swapped out at someone’s expense. In his example I normally use a 175 crank which does come on the 58 bike, but the 56 comes with a too small 172.5 crank. And as indicated above the stem would need to be changed.
The third misconception is that the steeper the seat-tube angle the better. This is simply not true. For sure a steeper seat tube angle than a road bike is almost always better on a tri bike, but a super steep 78-80 degree angle isn’t optimum for all riders or all conditions (for reference most tri bikes have the ability to adjust the effective seat angle from 75 to 80 degrees).
To use an analogy, not all road cyclists use a 75 degree seat angle even though the range is typically 72 to 75 degrees. On a road bike the optimum angle is related to the femur (thigh) length. A rider with a long femur has more mechanical advantage due to increased leverage. Some of the best climbers have long femurs. The common bike fitting school of thought is to take advantage of the longer lever and to put the rider further back behind the bottom bracket (compared to a normal femur) to achieve the optimum knee over pedal position. This is done by using a setback seat-post, sliding the saddle back on the rails, using a slacker seat tube angle or a combination of all three. So in this example the rider with the long thighs will ride a road bike with a 72.5 angle bike instead of a 73.5.
It has been my experience from racing and bike fitting that this really does work with a road bike. And I have found the same relationship in tri bike fitting as well. For example, if a rider has a long femur ratio (say .48) and has an optimum road bike seat angle of 72.5 then perhaps a 76.5 is optimum for that rider on a tri bike, not 78 degrees. Yet another rider with an average femur ratio and rides a 74 degree seat tune angled road bike might find a 78 degree angle to be best.
Finding the perfect position is a balancing act. You also need to not only consider your body’s geometry but also consider the terrain of your key races. For example if you race in a hilly region you need to be in a position where you can not only be aerodynamic on the flats but powerful on the climbs. I’m a pretty good climber and I have found that using a super steep position decreases my power on climbs. If I just pushed the saddle all the way forward (which is in vogue in some camps) I would be slower, at least in New England.
Determining the optimum seat tube angle is a complicated matter. And the only way to know for sure what is best for you is by doing real world time trials (not on a Computrainer) on a course that simulates your target race heart rate / power and the terrain you race in.
I hope this article has helped you avoid some common pitfalls of tri bike fitting. When a bike fits properly it should disappear under you and you become one with it. You should love to ride it and enjoy all aspects of riding… hammering the flats, climbing, bombing descents and ripping around corners. If you don’t feel that way on your tri bike you really should demand more. You owe it to yourself to be in a comfortable and fast bike that is also a blast to ride!
Please feel free to contact me if you have feedback or questions: Greg@Bethelcycle.com
Note: The pictures in this article where only taken for illustration purposes. In an actual bike fitting care would need to be taken that the bike's front and rear wheels are level for the fitting dimensions to be accurate.